When it comes to sharing your family history, one of the first things that people ask to see is the family tree. Of course there are great online family tree builders (such as Ancestry, FMP, and My Heritage) but that often involves family members having to create their own account. Creating a free account on Ancestry can be quite frustrating (Im not even sure how I did that a decade ago...). There are many other reasons why someone may not want to share one of these online trees. For example, I have chosen not to because I explore many theories in my trees, I dont always keep them the most up to date with all my knowledge, I know some of my family members would struggle with the technology, and I still want to maintain a little privacy within my research. For all of those reasons I chose to go the more simple route and create an interactive tree in Powerpoint. (Yes I do realize that this is significantly more work than updating my tree! But I dont care!).
Why Powerpoint?
I chose to use Powerpoint instead of creating a word document because it allows me to add buttons that can be used to navigate the presentation. When it comes to tracing the tree on to multiple pages, this feature removes a significant amount of confusion. The navigation buttons are also a handy way to link a person's profile to their box in the family tree diagram.
Creating the Template
How exactly you chose to split your family tree is up to you. I personally chose to do separate presentations for each of my grandparents' lines. The main factors in this decision were the overall presentation sizes, and that I didnt want to add in all of my extended family. Adding the number of people in the later would mean I would have to create a third presentation - I had enough work already that I didnt want to do this!
Once you have finalized the scope of your presentation, its time to start creating a template.
(If you dont already know how to create buttons, here is a link to some
instructions from Microsoft.)
SLIDE #1: Tree name, who it was compiled by, and year
This slide was particularly important to me because I have had family members "steal" my work in the past and claim it was their own. If your like me, you want to receive credit for the large amount of work that you put into compiling the family tree and analyzing the documents.
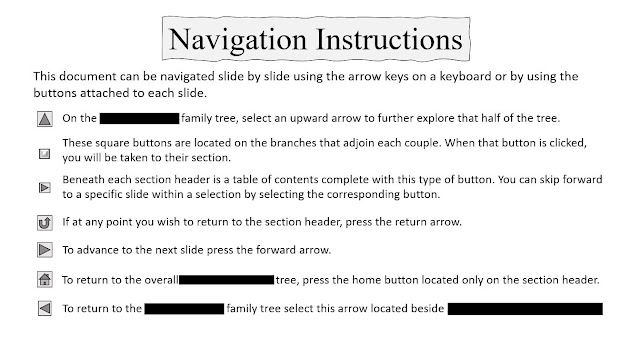
SLIDE #2: Navigation Instructions
I chose to add this slide mainly for my more technologically challenged relatives who may not already be familiar with the button feature in Powerpoint. Essentially this slide serves as a legend to what each button does and how they can be used to navigate the presentation (as opposed to the arrow keys on a keyboard). The black boxes
SLIDE #3: Section Header for First Family
I chose to feature my great grandparents as the first family header. The reason that I did this was that the resulting tree would allow me to create two distinct branches on separate slides (thus reducing the issue of overcrowding).
For each header I followed the same format. Both of the couples surnames were placed in large font with a slash between them. Underneath that I added a table of contents for their section. Beside each of the table entries I placed the third button from the navigation screen.
Slide #4: Section Family Tree
As I mentioned above, I used the family tree for my great grandparents family as a way to split into two separate trees. For all trees featured within a section I chose to add all of the children. For the two branches of the family tree that extend past this point I only feature the couples as to minimize confusion and overcrowding.
The template I included below features space for 6 children and two marriages, however it is very easy to create different family structures. I have successfully managed to fit a total of 8 children onto the same slide.
Note that in between each couple I have a space to add the marriage information. I chose to use 10.5 pt font for this information.
Inside each box I placed the name at the top in large bold font, followed by birth date, birth location, death date, and death location. I placed the subsequent pieces of information on their own line in unbolded 12 pt font. When possible I used 16pt font for the names, but did have to reduce the size for a few of the longer names.
Slide #5: Record Analysis
You can add as many of these slides as you want. There is not one set template at that I use for this type of slide because it is entirely dependent on the type of document you want to analyze. As a rule of thumb, I like to place red outlines around certain portions of information and attach call out boxes. The reason why I do this, is to help the reader better understand what the document tells us about the person and/or family.
For some types of documents I like to add additional pictures. In the case of an immigration record I might add a picture of the ship, or for an accident I might add some images that where published in the newspaper. Once again, the number and types of pictures that are added varies between documents.
Slide #6: Large Family Tree
I saved the best slide for last. This is the one that every family member wants to jump to first. The large family tree is similar to the Section Family Tree I described in Slide #4, however it only features direct ancestors. Another difference between this and the section family tree is that it features buttons on the branches that link to the couples' section of the presentation.
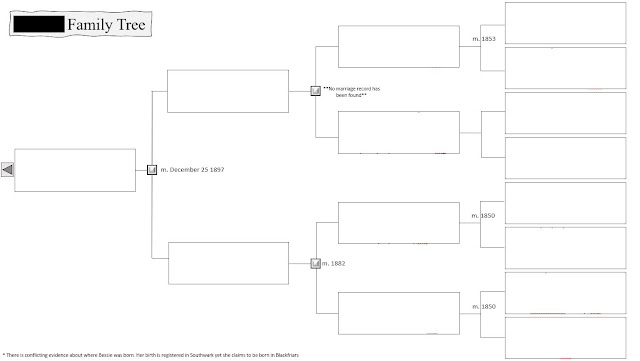
Note that in the above tree, I only feature the marriage date and not location. Once again, this decision was made to save on space and prevent overcrowding. One of the reasons I love creating my own family tree is that I can customize it in a way I would not have been able to if I used existing online software. I was able to add the marriage information as well as a note section at the bottom of the slide. More specifically I love that I can customize how the marriage information is entered. One of the couples in my tree never married. By adding a note of this in where the marriage information would go, I was able to reduce the confusion about their relationship.
If you want to have more than 4 generations, you can also add the arrow (on the left side) to the right side and link it to the extended portion of the tree.


Comments
Post a Comment